Part 4 - Inter-Domain Routing (03.06. - 07.06.2024)
This week, there will be the Routing-Party!
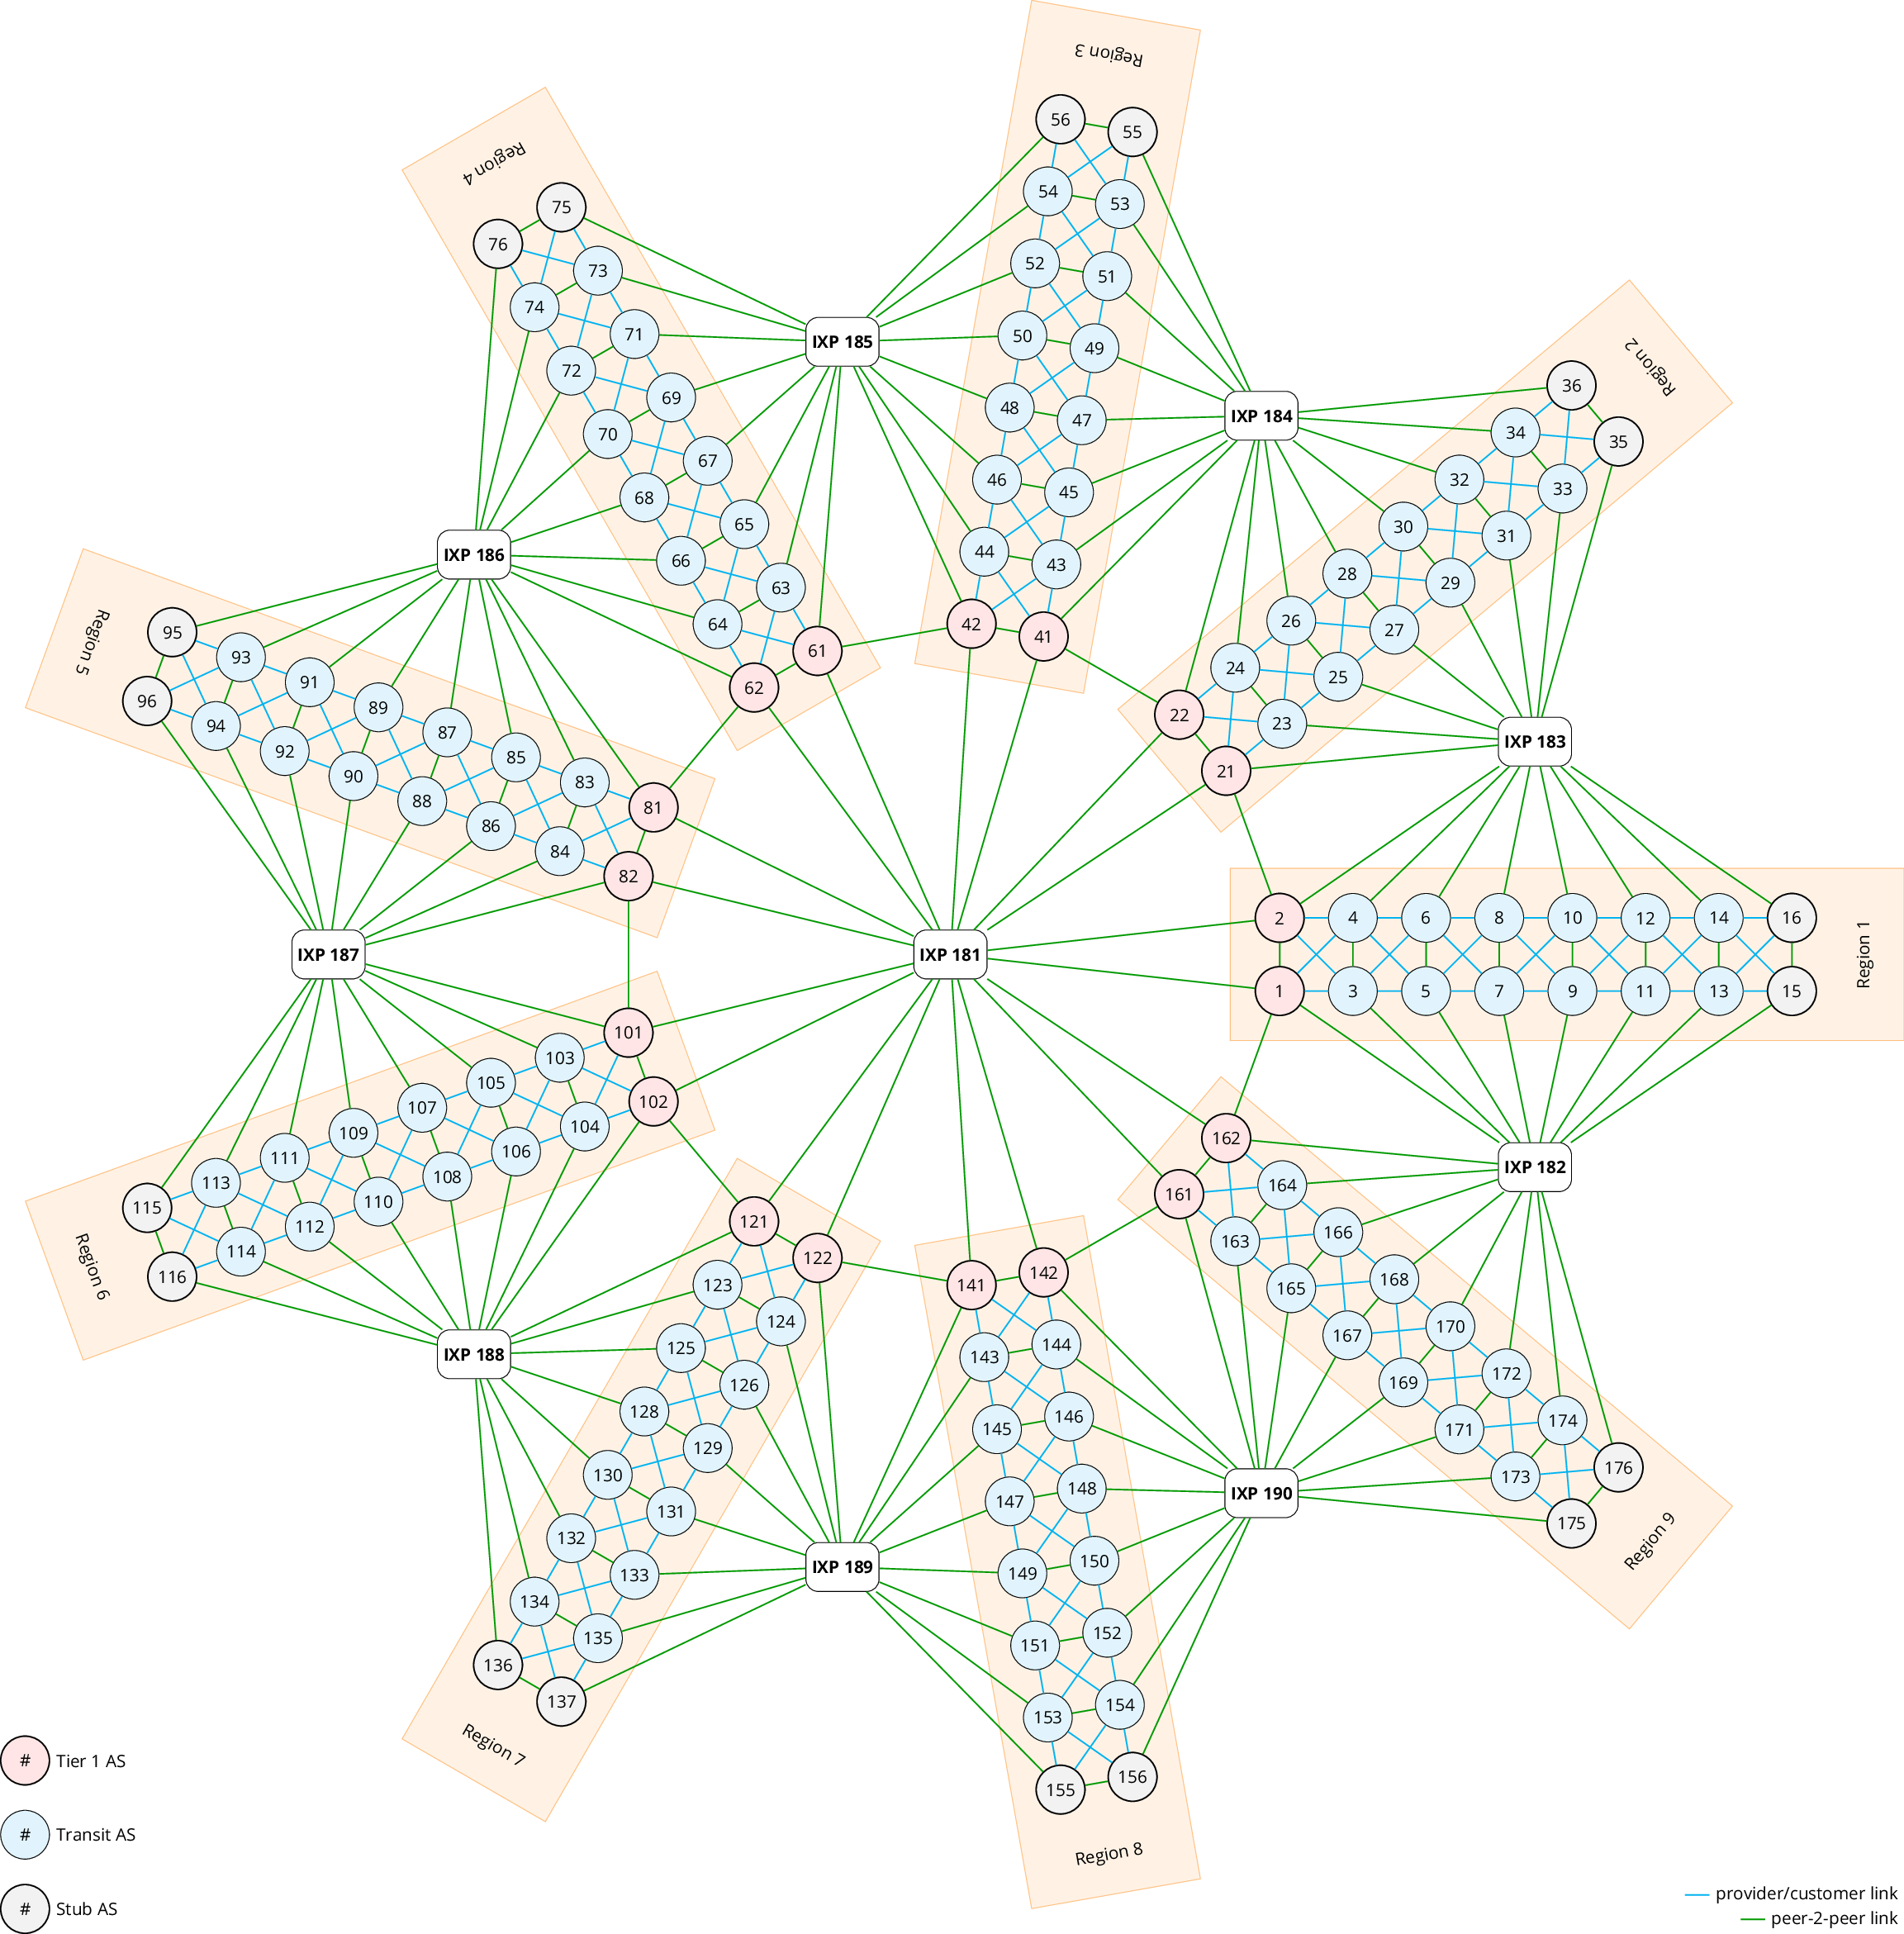
Topology Reminder
Task 1 (Question 2.2)
 Ideally, you should do this task during the Routing-Party.
Configure eBGP sessions
Configure the external BGP sessions (eBGP) with your neighboring ASes (including the IXPs). You can see which ASes you are directly connected to (and the IP subnet to use) on the connections page of the mini-Internet website. During the Routing-Party, find the groups connected with you and agree on which IP addresses (in the given subnet) you and your neighbors use.
For every eBGP session and in addition to the IP subnet, the Mini-Internet website also specifies which router is connected to the neighboring AS as well as a business relationship that will be important later.
If one of your routers is connected to a router that is in an AS operated by the TA team, we explicitly indicate which IP address to use.
You can filter the output to only see the BGP sessions that relate to your group. The screenshot below is an example of what the connections page shows for group 6.
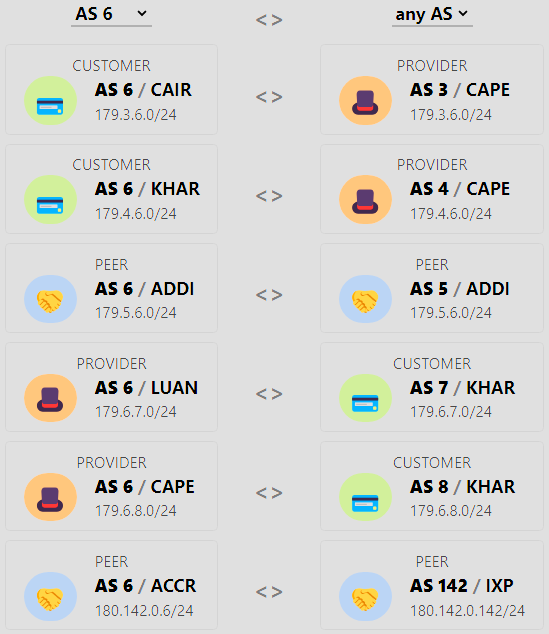
We can see that AS 6 has two providers (AS3 and AS4), two peers (AS 5 and IXP 142), and two customers (AS7 and AS8). Looking more closely, we can see that the router CAIR in AS 6 is connected to the router CAPE in AS 3 and that this link should use the IP subnet 179.3.6.0/24.
AS6 is also connected to the IXP 142 via its router ACCR.
For IXPs and all other TA-controlled ASes, we do not provide a subnet but a concrete IP address.
You must use this address.
For example, AS 6 should configure its router ACCR to use the IP address 180.142.0.6/24, and will be able to reach the IXP by pinging the IP address 180.142.0.142.
If the last octet in the address is
0, e.g.179.3.6.0/24, you need to find the group managing the other AS to agree on an IP address to use.\ If the last octet in the address is not0, e.g.179.142.0.6/24, you need to use the address exactly as specified.Make sure that you do not include any
179.0.0.0/24and180.0.0.0/24subnets in OSPF and that you do not activate OSPF for the external interfaces.By default, we have configured the IXPs to not relay your BGP advertisements to their other peers. Thus, it is normal if you do not see your prefixes advertised through the IXP. We will take care of that in a later question.
Advertise your prefix
Once the eBGP sessions are up, advertise your prefix to your peers. You must only advertise the /8 that has been assigned to you. In the meantime, your peers should advertise their /8 prefixes to you, as well as all the /8 prefixes they have received from their neighbors (since there are no BGP policies yet).
 To solve this question and configure eBGP correctly, you will have to use the
 next-hop-self command when you configure the external BGP sessions.
We explain why and how to configure it below.
Reminder: The IP address of the IXP Route Server is 180.Z.0.Z with Z as the IXP number.
Checking your solution
As with iBGP, verify that the eBGP sessions are working with show ip bgp summary.
Additionally, the matrix page of the mini-Internet shows which ASes can reach each other.
The matrix is updated every couple of minutes, so any of your changes may not appear immediately.
In one way or another, you should be able to reach as many other ASes as possible at the end of the Routing-Party. The matrix may indicate in orange that you can reach some ASes with incorrect paths; we will address this in the next question. For now, your goal is to get rid of as many red cells in the matrix as possible!
You will not be able to reach the stub ASes in each zone yet. Something strange is going on there, and we will investigate this later.
Task 2 (Question 2.3)
Configure local-pref and business relationships
Configure your local preferences as well as the export rules to implement the customer/provider and peer/peer business relationships with your neighbors (see the Gao-Rexford paper). The connections you have through your IXP must be considered peer-to-peer connections. You need to configure BGP route maps to solve this task. We explain how to do this below.
Keep in mind that the default behavior of the IXP Route Server is not to relay the BGP advertisements. Thus, for the time being, the prefixes you advertise to your IXP will not be propagated to the other IXP’s participants. Nevertheless, you must also configure the export rules for the eBGP session you have with your IXP. We will build on this in question 2.4 to advertise prefixes via the IXP.
To configure the export rules, you can tag incoming routes using BGP communities to keep track of where the routes have been learned and then match on the tag when exporting the routes.
We advise you to verify with traceroute or with the looking glass on the Mini-Internet website that the chosen paths honor the business relationships.
 You need to configure BGP route maps to solve this task.
When filtering outgoing advertisements, make sure to permit your own prefix to go through!
You need to configure BGP route maps to solve this task.
When filtering outgoing advertisements, make sure to permit your own prefix to go through!
Task 3 (Question 2.4)
Configure peering via IXPs
By default, we have configured the IXPs not to relay your BGP advertisements to their other peers.
To announce a prefix to another peer via an IXP, you must specify it using a BGP community value.
IXPs are configured to relay a BGP advertisement to a peer X if the advertisement includes a community value equal to N:X where N is the IXP number.
For example, if you are AS7 and you want to advertise a prefix to AS28 via the IXP121, you must add the community value 121:28 in your BGP advertisements.
In this question, you must use the community values to send BGP advertisements to the peers connected to you through an IXP. However, for business reasons, you do not just want to peer with every other AS at the IXP.
- You do want to peer through this IXP with ASes that are located in another region.
- You do not want to peer through this IXP with ASes that are located in the same region.
To not peer through the IXP with ASes in the same region, you must (i) not advertise them any prefixes and (ii) deny any advertisements coming from the IXP that contain ASes in the same region in the path.
To check whether you properly configured (ii), we have configured two TA-managed ASes in each zone to advertise their prefix to all the ASes connected to their IXP.
Checking your solution
Use show ip route bgp to verify that you do not permit any advertisements for the ASes in the same region that are coming from the IXP.
Use the looking glass page on the mini-Internet website to verify that other ASes in the same region do not receive your advertisements via the IXP and that ASes in the adjacent region do receive your advertisements via the IXP.
At the end of this question, you should be able to reach as many ASes as possible with the correct path (a green cell in the matrix).
You will still not be able to reach the stub ASes in each zone yet, though.
Tutorials
See the instructions below to sove this week's tasks.
Configure eBGP
By default, whenever the remote-as is different from the local number (here 2), the BGP session is configured as an external one (i.e., an eBGP session is established).
 Important for eBGP sessions with FRR v.7.5 (used in this year’s project):
When setting up an eBGP session, there is an implicit route map denying everything that is automatically configured on the session.
Route maps enable you to express input and output filters on the routes sent and received by a BGP session.
We explain them in detail next week.
To start advertising and receiving prefixes on an eBGP session, you need to override this implicit route map by explicitly defining a route map permitting all (or only some) prefixes and applying it on the corresponding eBGP session. For instance, to advertise and receive all the prefixes, you need to define a route map that permits everything as follows:
Important for eBGP sessions with FRR v.7.5 (used in this year’s project):
When setting up an eBGP session, there is an implicit route map denying everything that is automatically configured on the session.
Route maps enable you to express input and output filters on the routes sent and received by a BGP session.
We explain them in detail next week.
To start advertising and receiving prefixes on an eBGP session, you need to override this implicit route map by explicitly defining a route map permitting all (or only some) prefixes and applying it on the corresponding eBGP session. For instance, to advertise and receive all the prefixes, you need to define a route map that permits everything as follows:
10. We’ll explain this and details on route maps in the next section of the tutorial.
Then, you need to apply this route map on the BGP session for both the advertised and received prefixes:
router# conf t
router(config)# router bgp 2
router(config-router)# neighbor 150.0.0.1 route-map ACCEPT_ALL in
router(config-router)# neighbor 150.0.0.1 route-map ACCEPT_ALL out
 With some routers (and that is the case for our FRR routers), BGP will not announce a route for a prefix it does not know how to reach.
If you want to announce your /8 prefix, you must then configure a default route to Null, such as the following:
With some routers (and that is the case for our FRR routers), BGP will not announce a route for a prefix it does not know how to reach.
If you want to announce your /8 prefix, you must then configure a default route to Null, such as the following:
Perhaps one of your BGP neighbors advertises prefixes to you as well. Let’s check that:
In this case, we can see that neighbor 2.151.0.1 has advertised one prefix: 2.0.0.0/8.
The B at the beginning of the line indicates that the router has learned this prefix from BGP.
BGP next-hop-self
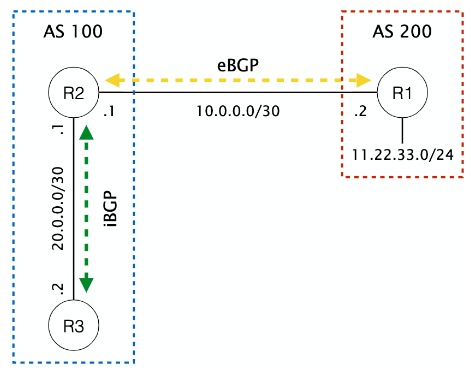
The figure below illustrates a possible pitfall when eBGP announcements are distributed over iBGP sessions.
If router R1 is advertising its prefix 11.22.33.0/24 towards R2 (over the eBGP session), the next hop of the advertisement is the IP of the outgoing interface of R1 (10.0.0.2).
Router R2 then distributes this advertisement to all its iBGP neighbors (R3).
Per default, the next-hop of the advertisement is not changed and is still 10.0.0.2.
That can lead to problems for router R3. In a normal network configuration, the subnets used between two eBGP routers (10.0.0.0/30) are not distributed in the connected ASes, e.g. via OSPF.
Therefore, Router R3 does not know how it can reach the next hop of the advertised prefix (11.22.33.0/24) and will discard the advertisement.
To solve this problem, we can use the BGP next-hop-self command.
When properly configured, router R2 uses its own interface IP as next-hop every time it distributes announcements from eBGP sessions to its iBGP neighbors.
In this example, R2 would replace the next-hop 10.0.0.2 with its interface IP connected to R3 (20.0.0.1).
Router R3 then receives an advertisement for prefix 11.22.33.0/24 with next-hop 20.0.0.1.
The 20.0.0.0/30 subnet is distributed via OSPF, and R3 does, therefore, know how to reach the next hop of the advertisement and can install this prefix in its forwarding table.
To add the next-hop-self command on FRR routers, you can use the following commands (on router R2):
router# conf t
router(config)# router bgp 100
router(config-router)# neighbor 20.0.0.2 remote-as 100
router(config-router)# neighbor 20.0.0.2 next-hop-self
In this example, R3 is the only iBGP neighbor of R2. Generally, a router that redistributes external prefixes into iBGP must set itself as the next hop for all its iBGP neighbors.
Note
The IP addresses in this example are not the same as in the Mini-Internet. Remember that in the mini-Internet, you need to use the loopback address for iBGP sessions.
BGP Policies
After you have BGP running, you can configure BGP policies. For example, you may prefer sending traffic to your cheapest provider. For security reasons, you may also want to avoid sending traffic to one AS for a particular prefix.
BGP offers several ways to configure such policies.
As we have seen in the lecture, the LOCAL-PREF attribute can help you to influence where your AS is routing traffic.
To influence how other ASes route traffic towards your AS, you can use AS-Path prepending, a more specific prefix advertisement, or the MED attribute (in case of multiple different connections to the same AS neighbor).
In FRR, BGP policies are defined using the route-map command.
In the following, we describe how an FRR route map is configured and applied to certain BGP sessions.
Then, we look at several important BGP attributes that you may want to use in your policies: IP prefixes, BGP community values, and AS paths. For documentation on other BGP attributes, look at the FRR documentation on BGP.
Helpful commands
The show ip bgp command is very useful to display all prefixes/routes, for example, to check that your route maps are working correctly. You can also filter the output. If you want to display all the prefixes/routes with a certain BGP community value (e.g. 15:100, but we’ll explain what community values are below), you can use the following command:
Remember that you can always use ? to show all available commands (e.g. show ip bgp ?).
To debug the route maps applied to all outgoing routes for a neighbor, you can use the command show ip bgp neighbors <neighbor-IP> advertised-routes to list all routes that are advertised to a neighbor.
To list all updates a router has accepted when receiving them from a neighbor, you can use the command sh ip bgp neighbors <neighbor-IP> routes.
To debug the route maps applied to all incoming updates from a neighbor, you can use the command sh ip bgp neighbors <neighbor-IP> received-routes. This command lists all updates the router has received from a neighbor, including the updates dropped later by the route maps. By default, incoming routes are not stored and received-routes shows no output; you need to enable this behavior manually. Let’s assume you have a router with an eBGP connection to a neighbor 11.11.11.11. You can enable the received-routes command as follows:
router# config
router(config)# router bgp
router(config-router)# neighbor 11.11.11.11 soft-reconfiguration inbound
router(config-router)# exit
router(config)# exit
router# sh ip bgp neighbors 11.11.11.11 received-routes

# Please disable the command when it's no longer needed to save memory.
router# config
router(config)# router bgp
router(config-router)# no neighbor 11.11.11.11 soft-reconfiguration inbound
soft-reconfiguration inboundmay store a lot of additional routing information and increase the memory load on our server. We highly recommend that you only enable it when you need to debug specific route maps to ensure that our server does not run out of resources.
Sometimes, BGP may not take your updated route maps into account immediately. If so, you can use clear ip bgp * to force the router to reset the state of all BGP sessions; it will receive new updates from its neighbors and reapply the route maps. Always try this command if you suspect your route maps are not working as expected.
Important preface: sequence number, permit, and deny.
In the following commands, you will often see the statements permit and deny as well as a sequence number, like permit 10.
Sequence Number: FRR (and other routing software) processes route maps sequentially, starting with index 0 and counting up. It uses short-circuit evaluation: as soon as a route map matches, it is processed, and no further route maps are evaluated. Keep these two facts in mind when assigning sequence numbers to your route maps:
- the lower the sequence number, the earlier the route map is evaluated, and
- route maps with a higher sequence number are not applied if a route map with a lower sequence number matches.
Permit/Deny: The terms permit and deny have different meanings depending on the context, so we want to clear this up right away:
- In route maps,
permitanddenyindicate actions, i.e. aroute-map NAME permit SEQis a route map that allows advertisements, while aroute-map NAME deny SEQblocks advertisements. - In other data structures, e.g. community lists, prefix lists, or as-path access lists,
permitanddenyindicate whether the match is inverted or not. For example: ip prefix-list OWN_PREFIX permit 1.0.0.0/8matches prefix1.0.0.0/8(positive match).ip prefix-list OWN_PREFIX deny 1.0.0.0/8matches everything except prefix1.0.0.0/8(negative match).
Route maps
Route maps enable you to express input and output filters that are applied immediately after a BGP route is received from a neighbor or just before it is sent to a neighbor. Note that the route maps are applied to BGP updates and not to the actual traffic that passes your routers. A BGP update is a message that contains information about a route, such as the prefix, the AS path, the next hop, and other attributes that you’ll learn more about below.
A route map is composed of two parts: a match and a set part similar to if/then statements in programming languages. The match part is a boolean predicate that determines whether the update is accepted at all (or whether it is blocked). If it is accepted, the set can modify the attributes of the BGP update.
First, you need to define a route map, and then you can apply it to a BGP session.
Define a route map: match
Let’s use the FRR help to see the most important attributes you can match:
router# conf t
router(config)# route-map MY_ROUTE_MAP permit 10
router(config-route-map)# match ?
    as-path
        Match BGP AS path list
    community
        Match BGP community list
    interface
        Match first hop interface of route
    ip
        IP information
    metric
        Match metric of route
    origin
        BGP origin code
    peer
        Match peer address
As you can see, you can match pretty much any attribute contained in a BGP update, from AS path to IP addresses or subnets. We’ll explain a few important attributes for matching in more detail below.
Whenever you create a route map, you must indicate if you want to permit or deny the update. As we explained above. Matching a permit route map allows the update to pass, also executing the set part. Matching a deny route map drops the update.
You can use multiple match statements in the same route map. If you do, all match statements must be true for the route map to match. You can think of this as an and condition.
If you use any match, FRR will implicitly deny everything that has not been matched explicitly.
If you don’t use any match, your route map will match everything.
Define a route map: set
Let’s also use the FRR help to see the most important attributes you can set:
router# conf t
router(config)# route-map MY_ROUTE_MAP permit 10
router(config-route-map)set ?
    as-path
        Transform BGP AS-path attribute
    community
        BGP community attribute
    ip
        IP information
    metric
        Metric value for destination routing protocol
    local-pref
        BGP local preference path attribute
    origin
        BGP origin code
As described in the course, the set part enables you to modify any route attribute. Among others, you can set:
- a local preference (
local-pref, to prefer some advertisements over others) - modify the AS path (e.g., for AS path prepending, i.e. to make a path seem longer than it is)
- set community attributes (more below).
Observe that these operations will only be done on the routes you have matched with the match command if you used the permit clause. A set clause can be empty, which is useful if you only want to filter certain routes but not modify them.
Finally, you can modify multiple route attributes in the same set clause. Just use multiple set commands in the same route map. All set commands are applied one after another.
Apply a route map
Once you have defined a route map, you need to apply it to a BGP session. As mentioned before, a route map can either be applied to incoming updates (routes received from a neighbor) or to outgoing updates (routes sent to a neighbor) by using the keywords in and out, respectively. In the following example, a route map named FILTER_IN is applied to all incoming routes from two neighbors, 2.0.0.2 and 3.0.0.3, and a route map named FILTER_OUT is applied to all outgoing routes only for neighbor 3.0.0.2. Note that you can apply a route map to multiple BGP sessions, as we do here with the FILTER_IN route map.
router# conf t
router(config)# router bgp
router(config-router)# neighbor 2.0.0.2 route-map FILTER_IN in
router(config-router)# neighbor 3.0.0.3 route-map FILTER_IN in
router(config-router)# neighbor 3.0.0.3 route-map FILTER_OUT out
Importantly, you can only apply one route map to any BGP neighbor each for incoming/outgoing updates. If you want to apply multiple route maps, they must use the same name and different sequence numbers, as we’ll show below.
show runto verify that your route maps are correctly applied.
You must apply route maps to eBGP sessions to receive any updates from your neighbors. While iBGP sessions (within your AS) accept all updates from other iBGP sessions, eBGP sessions (with external neighbors) drop all updates by default unless you have a route map to explicitly allow them.
Multiple route maps and matching logic
As described above, you can think of the match part of a route map as an and condition: all match statements must be true for the route map to match.
In the same way, you can think of multiple different sequence numbers as a short-circuit or condition or as a sequence of if/elif/else statements in programming languages.
For example, assume that you want to process BGP updates incoming from your neighbor 2.0.0.2 as follows:
if (prefix == 1.0.0.0/8) AND (community == 15:100):
    set local-preference 1000
elif (prefix == 1.0.0.0/8):
    set local-preference 2000
else:
    deny
You can achieve this with the following route maps. Pay attention to the sequence numbers and match statements. Also, note that all route maps must have the same name. Otherwise, they replace each other.
router# conf t

# We need prefix lists to match prefixes and community lists to match
# community values. We explain this in more detail below.
router(config)# ip prefix-list PREFIX_1 permit 1.0.0.0/8
router(config)# bgp community-list 1 permit 15:100

router(config)# route-map FILTER_IN permit 10
router(config-route-map)# match ip address prefix-list PREFIX_1
router(config-route-map)# match community 1
router(config-route-map)# set local-preference 1000
router(config-route-map)# exit

router(config)# route-map FILTER_IN permit 20
router(config-route-map)# match ip address prefix-list PREFIX_1
router(config-route-map)# set local-preference 2000
router(config-route-map)# exit

router(config)# route-map FILTER_IN deny 30
router(config-route-map)# exit

router(config)# router bgp
router(config-router)# neighbor 2.0.0.2 route-map FILTER_IN in
router(config-router)# exit
router(config)# exit
route-map FILTER_IN deny 30is optional, but it never hurts to be explicit to make your logic easier to understand!
Important BGP update attributes
IP addresses and prefixes
You can match on specific IP prefixes, which can be particularly helpful for matching your own prefix. However, you cannot match a prefix directly in a route map. First, you need to create an ip prefix-list, which you can then match.
A common issue is that your outgoing route maps should not deny your own prefix. Remember that the default behavior is to deny everything that does not match, so you need to add a route map that matches your own prefix and permits it. Assume your prefix is 1.0.0.0/8; then you can use the following commands to create a prefix list and match it in a route map:
router# conf t
router(config)# ip prefix-list OWN_PREFIX permit 1.0.0.0/8
router(config)# route-map FILTER_OUT permit 10
router(config-route-map)# match ip address prefix-list OWN_PREFIX
router(config-route-map)# exit
router(config)# exit
If you want to match one of several prefixes, you can use multiple ip prefix-list entries with the same name.
router# conf t
router(config)# ip prefix-list MULTI_PREFIX permit 1.0.0.0/8
router(config)# ip prefix-list MULTI_PREFIX permit 2.0.0.0/8
router(config)# exit
show runto verify that your the result of your commands matches your expectations.
BGP community values
A BGP community can be seen as a label or a tag that can be attached to any update in the set part of a route map and matched against later on a different router. In practice, a community is often written as two integers separated by a colon. The first integer identifies the AS, and the second one describes the value/purpose of the community. For example, if you are AS number 15 and you want to tag certain BGP routes with the value 100, you could use the following BGP community: 15:100. You can add more than one BGP community value to a route.
Matching community values
If you want to match community values, you need to use a community-list. To define a community-list matching the community value from before (15:100), you can use the following command:
The community list has the name/number 1. Note that while prefix lists may have arbitrary names, community lists accept only numbers.
If you want to match multiple community values, you have two options: if you want to require all community values to match, add multiple values to one community list entry. If you want to match any of the community values, add multiple community list entries, similar to a prefix list. The following community list matches (15:100 and 15:200) or 15:300. Note that all community list entries use the same community list number 1.
router# conf t
# Multiple community values in one community-list entry: AND
router(config)# bgp community-list 1 permit 15:100 15:200
# Multiple community-list entries: OR
router(config)# bgp community-list 1 permit 15:300
router(config)# exit
Setting community values
Community values are set using the set community command. They are attached to an update and are sent to your neighbors as well. You can set multiple community values with set community <value1> <value2>.
The set community command overrides all existing community values. In our project, this is typically what you need. In particular, you can use set community without any arguments to remove all community values from an update that you may have received from your neighbors. If you explicitly wish to keep existing community values, use set community additive <values>.
Example
Let’s assume you have a router with three eBGP connections to neighbors with the IPs 11.11.11.11, 22.22.22.22, and 33.33.33.33. You want to set the local preference of all routes coming from 11.11.11.11 to 1000, and of all routes coming from 22.22.22.22 to 2000. Furthermore, you want to use BGP community values to make sure that only the routes coming from neighbor 11.11.11.11 are advertised to neighbor 33.33.33.33, and not the routes from neighbor 22.22.22.22.
router# conf t
router(config)# route-map MAP_IN_1 permit 10
router(config-route-map)# set community 15:1
router(config-route-map)# set local-preference 1000
router(config-route-map)# exit

router(config)# route-map MAP_IN_2 permit 10
router(config-route-map)# set community 15:2
router(config-route-map)# set local-preference 2000
router(config-route-map)# exit

router(config)# bgp community-list 1 permit 15:1

router(config)# route-map MAP_OUT permit 10
router(config-route-map)# match community 1
router(config-route-map)# exit

router(config)# router bgp
router(config-router)# neighbor 11.11.11.11 route-map MAP_IN_1 in
router(config-router)# neighbor 22.22.22.22 route-map MAP_IN_2 in
router(config-router)# neighbor 33.33.33.33 route-map MAP_OUT out
router(config-router)# exit
router(config)# exit
BGP AS path
Each route includes all ASes on the path to your router in the as-path attribute. Routers allow you to match on the AS path to, for example, block all routes that go through a certain AS. At the same time, you can also modify the AS path by prepending your AS number multiple times to influence the path selection of other routers.
You need to read AS paths right-to-left, i.e., the AS at the end of the AS path is the one that originated the route. For example, the path originating in AS 1 going over AS 2 with the last hop AS 3 is written as 3 2 1.
Similar to prefix lists and community list above, you match AS paths with an as-path access-list containing AS path expressions.
AS path expressions
An AS path expression is a restricted regular expression allowing you to define a pattern to match an AS path. Most of the regular expression symbols are supported:
| Symbol | Description |
|---|---|
. |
match any |
^ |
match beginning of the AS path |
$ |
match end of the AS path |
_ |
match space, and beginning of the line |
* |
match 0 or more instances of previous atom |
? |
match 0 or 1 instance of previous atom |
+ |
match 1 or more instances of previous atom |
\| |
logical OR |
If you, for example, want to:
- match all routes that have AS 1 anywhere in the path, use
_1($|_)(see below for more info); - match all routes passing through AS 500, use
_500_; - match all routes originating at AS 999, use
_999$; - match all routes received from AS 1800, use `^1800_;
_may be unexpected! It works as follows:_matches whitespace and the start of the path, but not end the of the path. Additionally, if you want to match whitespace or the end of the path, you need to use the expression($|_). For some reason,(_|$)does not work; be careful with the order of the symbols.
AS path access list
As with prefix lists and community lists, you can use multiple entries in the same AS path access list to use any of several provided expressions. For example, to match all routes that have either AS 30 or AS 32 as the last hop (before your AS), use:
Equivalently, you could also write:
Like prefix lists, AS path access lists can have arbitrary names.
show ip bgp regexp YOUR_REGEXPto display routes matching the AS path regular expressionYOUR_REGEXP.
Example
Let’s assume you have a router with an eBGP connection to a neighbor 11.11.11.11. You want to only accept routes that have originated at AS 999 from your neighbor:
router# conf t

router(config-router)# bgp as-path access-list ALLOWED_PATH permit _999$

router(config)# route-map MAP_IN permit 10
router(config-route-map)# match as-path ALLOWED_PATH
router(config-route-map)# exit

router(config)# router bgp
router(config-router)# neighbor 11.11.11.11 route-map MAP_IN in
router(config-router)# exit
router(config)# exit
AS path prepending
By default, a router prepends its own AS number to the AS path of a route before sending it to its neighbors. The AS path is mainly used to avoid routing loops but is also incorporated in the decision process: if several routes have the same local preference values, BGP prefers the one with the shortest AS path.
In some situations, it is desirable to make the AS path seem longer than it is by prepending your own AS number multiple times.
To achieve that, you can use the following command: set as-path prepend ASN ASN ASN ....
Hence, if you want to append your own AS number (for example, 500) three times, you can do it as follows:
router# conf t

router(config)# route-map MAP_OUT permit 10
router(config-route-map)# set as-path prepend 500 500 500
router(config-route-map)# exit

router(config)# router bgp
router(config-router)# neighbor 11.11.11.11 route-map MAP_OUT out
router(config-router)# exit
router(config)# exit
^<Your-ASN>($|_).
Additional Resources
Watch the following video to reinforce your understanding of BGP route selection:
Watch the following video to reinforce your understanding of peering in today’s Internet:
page version 1.0 - last edited May 5th, 2024